Background: The Challenge of Video Understanding Is More Than “Just Passing More Images”
After building image understanding, many teams naturally view video understanding as “splitting the video into multiple images and asking the model.” This approach works for demos, but in production, it quickly runs into three problems.
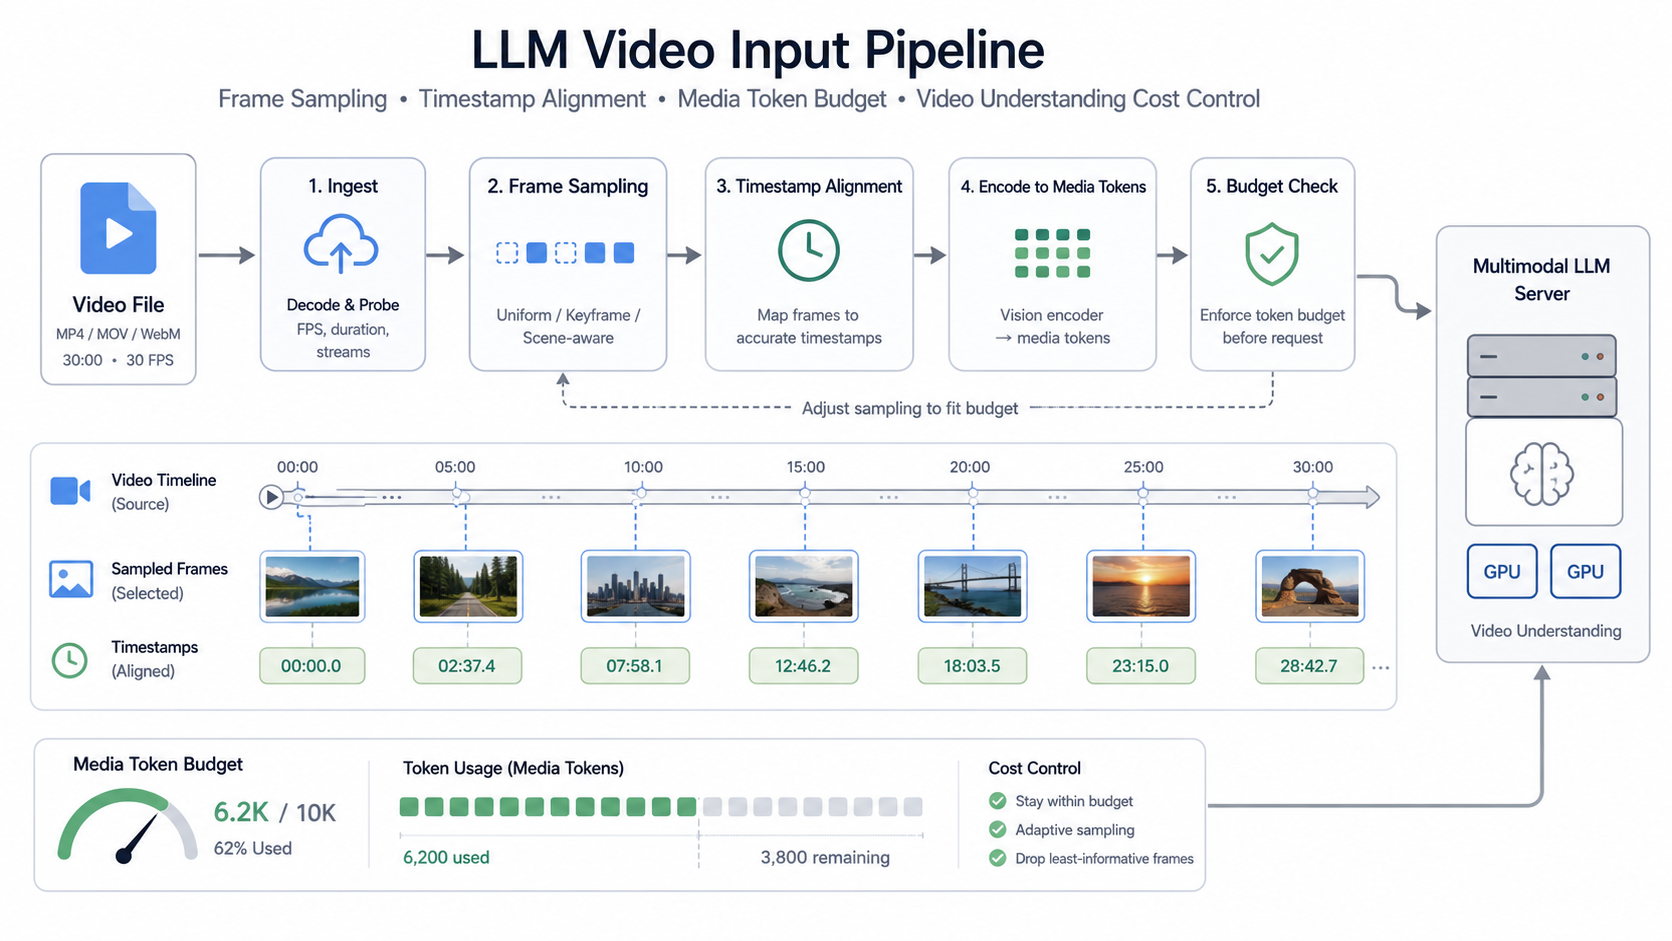
First, cost is uncontrollable. A video isn’t a single image; it’s a sequence of images unfolding over time. A 30-second video sampled at 1 FPS yields 30 frames; at 5 FPS, it’s 150 frames. If each frame is processed at high resolution, media tokens, upload time, encoding time, and model latency all increase significantly.
Second, quality is uninterpretable. When the model answers incorrectly, you need to know exactly which frames it saw, which key actions were skipped, whether timestamps were offset, if subtitles and audio were included, and whether a long video only used the first few minutes. If you only save the final prompt, it’s very difficult to debug.
Third, the engineering pipeline is much longer. Video input involves file upload, transcoding, decoding, frame extraction, timestamp alignment, audio track processing, segmentation, caching, model invocation, and result ingestion. Any layer can fail—the file is still processing, the video is corrupted, some frames can’t be decoded, the upload size exceeds limits, timestamps are lost, or the model only saw thumbnail frames.
The Gemini API’s video understanding documentation explicitly states that Gemini can process videos, support description, segmentation, information extraction, answer questions about video content, and cite specific timestamps; it also distinguishes input methods like File API, Cloud Storage, Inline Data, and YouTube URLs. vLLM’s multimodal input documentation also treats video decoding backends, frame recovery, pre-extracted frame sequences, and video metadata as separate issues. This shows that video input is no longer a simple attachment, but a data pipeline that needs governance.
Core Principles: Video Input Must Manage Content, Time, and Budget Simultaneously
The Video File Is Not the Final Form of Model Input
What the model ultimately sees is usually not the raw MP4 file itself, but a visual representation extracted from the video by the platform or a custom service: frames, patches, visual tokens, time segments, audio clips, or subtitles. Different platforms may hide some processing details, but production systems still need to master the most critical metadata before entering the model:
type VideoInputProfile = {
  videoId: string;
  sourceUri: string;
  mimeType: "video/mp4" | "video/webm" | "video/quicktime";
  durationSec: number;
  fps: number;
  width: number;
  height: number;
  bytes: number;
  hasAudio: boolean;
  decodeProfile: string;
  samplingProfile: string;
  mediaResolution: "low" | "medium" | "high";
};
This profile isn’t just for documentation; it provides a common baseline for subsequent budgeting, caching, replay, and quality evaluation.
Media Token Budget Must Be Calculated Per Frame
The Gemini media resolution documentation explains that media_resolution controls the maximum number of tokens allocated by the Gemini API when processing media inputs like images, videos, and PDFs, thus balancing quality, latency, and cost. The documentation also lists approximate token counts for different resolutions in video scenarios:
| Resolution | Estimated Tokens Per Frame | Use Case |
|---|---|---|
| Low / Medium | ~70 tokens | General video summarization, action recognition |
| High | ~280 tokens | Dense text, small detail OCR |
This information is critical for production design. It means the video budget can be abstracted as:
media_tokens ≈ sampled_frames × tokens_per_frame(resolution)If a 10-minute video is sampled at 1 FPS, that’s approximately 600 frames. Even at an estimate of 70 tokens per frame, that’s already 42,000 media tokens, not including the text prompt, subtitles, audio transcription, and model output. For scenarios like customer service quality inspection, classroom summarization, meeting recordings, and surveillance clip analysis, costs can easily spiral out of control without prior sampling and budgeting.
Timestamps Are First-Class Citizens in Video Understanding
Video questions are often not “what’s in the frame,” but “when did what happen.” For example:
- At which second did the user click the wrong button?
- What appeared 5 seconds before the accident?
- At what minute did the instructor explain a concept?
- When did a person enter and leave in a surveillance feed?
- Which segment of a product video shows the defect?
Therefore, frame extraction shouldn’t just save images; it must also save the frame index, original FPS, timestamp, sampling strategy, and total frame count. The vLLM documentation also points out that when clients pre-extract frames and send a video/jpeg sequence, they can pass metadata like fps, frames_indices, total_num_frames, and duration via media_io_kwargs to preserve the original video’s temporal information.
A replayable sampling record should look like this:
{
  "video_id": "vid_20260709_001",
  "duration": 1800.0,
  "fps": 30.0,
  "total_num_frames": 54000,
  "sampling_profile": "scene_aware_32_frames_v2",
  "sampled_frames": [
    { "frame_index": 0, "timestamp": 0.0, "reason": "start" },
    { "frame_index": 4500, "timestamp": 150.0, "reason": "scene_change" },
    { "frame_index": 12600, "timestamp": 420.0, "reason": "query_relevant" }
  ]
}
Without such records, when the model says “an anomaly occurred around 07:00,” it’s difficult for the platform to determine if it actually saw that segment or was guessing based on sparse frames.
Engineering Implementation: A Production-Ready Video Input Pipeline
1. File Admission: Determine If It Can Enter the Pipeline First
Before a video enters the model, perform file admission rather than uploading directly. The admission layer should at least check:
- MIME type and extension match
- File size exceeds the inline limit
- Duration exceeds the task’s allowed range
- Resolution and frame rate are abnormal
- Whether audio and subtitle tracks exist
- Whether it can be decoded
- Whether it contains excessive black screens, solid-color frames, or corrupted segments
The Gemini documentation recommends: use the File API for larger files, longer videos, or videos that need to be reused; small videos can be inline; requests larger than 20MB or videos with significant duration should use the Files API. Production systems should adopt a similar分流 (traffic splitting) approach—short videos go synchronous or inline, large videos go asynchronous with upload and processing status polling.
type VideoAdmissionDecision =
  | { action: "inline"; reason: string }
  | { action: "upload_file_api"; reason: string }
  | { action: "async_job"; reason: string }
  | { action: "reject"; reason: string };

function decideVideoAdmission(v: VideoInputProfile): VideoAdmissionDecision {
  if (v.bytes > 20 * 1024 * 1024 || v.durationSec > 60) {
    return { action: "upload_file_api", reason: "large_or_long_video" };
  }
  if (v.durationSec > 1800) {
    return { action: "async_job", reason: "long_video_requires_segmented_processing" };
  }
  if (!v.mimeType.startsWith("video/")) {
    return { action: "reject", reason: "unsupported_mime_type" };
  }
  return { action: "inline", reason: "small_one_off_video" };
}
Admission decisions must be logged. Otherwise, if the same type of video is sometimes synchronous and sometimes asynchronous, subsequent troubleshooting will be chaotic.
2. Decoding and Probing: Make FFmpeg / OpenCV Observable Steps
The first type of failure in video input often occurs during decoding: the container format is readable but some frames are corrupted, the audio track is abnormal, the duration metadata is inaccurate, or timestamps in variable frame rate videos are discontinuous. The FFmpeg documentation provides basic capabilities like stream selection and mapping, while the vLLM documentation explains that its video decoding backend can choose OpenCV, PyAV, or TorchCodec, all of which ultimately depend on FFmpeg.
Production systems should make decoding probing an explicit step:
ffprobe -v error \
  -show_entries format=duration,size \
  -show_streams \
  -of json input.mp4
The probe results should at least record: duration, fps, width, height, codec, audio streams, subtitle streams, frame count estimate, and probe error. Don’t wait for the model call to fail before discovering that the video file itself is unusable.
3. Sampling Strategy: Don’t Use a Fixed FPS for All Videos
The simplest sampling is a fixed FPS, e.g., one frame per second. But this isn’t always optimal.
| Video Type | Recommended Strategy | Explanation |
|---|---|---|
| General video summarization | Uniform sampling, low FPS | Goal is to cover overall content |
| Operational recordings, surveillance, sports, instructional demos | Scene cuts + keyframes + query-relevant sampling | Depends on key action localization |
| Screen recordings, code demos, tables, PPT recordings | Keyframes + interval sampling, high resolution | Need to read small text |
Recent video understanding research also repeatedly points out that the difficulty of long video understanding lies in selecting key segments relevant to the question from a large number of frames. The GenS paper discusses the computational burden of a large number of frames in long-form video and proposes a query-related frame sampler; GroundVTS also points out that uniform sampling can lead to sparse keyframes and loss of temporal cues. Production systems don’t necessarily need to adopt the paper’s algorithms directly, but they should avoid treating “fixed one frame per second” as the only strategy.
A practical sampling configuration can be written like this:
video_sampling_profiles:
  summary_low_cost:
    strategy: uniform
    target_frames: 24
    media_resolution: low
    use_case: general_summary
  action_tracking:
    strategy: scene_aware
    target_frames: 64
    media_resolution: medium
    keep_timestamps: true
    use_case: event_localization
  screen_recording_ocr:
    strategy: keyframe_plus_interval
    target_frames: 40
    media_resolution: high
    keep_timestamps: true
    use_case: text_heavy_video
4. Timestamp Alignment: Sampled Frames Must Be Able to Go Back to the Original Video
When sampling, don’t just output image files; also output a frame manifest:
type SampledFrame = {
  frameId: string;
  frameIndex: number;
  timestampSec: number;
  width: number;
  height: number;
  reason: "uniform" | "keyframe" | "scene_change" | "query_relevant";
  imageSha256: string;
};
If the model’s response references “around 12:46,” the backend should be able to locate which input frames cover that time period and pull up the screenshots, original frames, and sampling parameters for debugging.
For the pre-extraction and then upload pipeline, it’s especially important to retain fps, frames_indices, total_num_frames, and duration. Otherwise, the model sees a series of images, not a video with a temporal structure.
5. Media Token Budget: Budget First, Then Sample, Then Request
Video requests should first estimate the budget, then decide on the sampling strategy:
type VideoBudget = {
  maxMediaTokens: number;
  maxFrames: number;
  resolution: "low" | "medium" | "high";
  allowAdaptiveSampling: boolean;
};

function estimateMediaTokens(frames: number, resolution: "low" | "medium" | "high") {
  const tokensPerFrame = resolution === "high" ? 280 : 70;
  return frames * tokensPerFrame;
}

function chooseFrameCount(durationSec: number, budget: VideoBudget) {
  const byBudget = Math.floor(budget.maxMediaTokens / estimateMediaTokens(1, budget.resolution));
  const byProfile = durationSec < 60 ? 24 : durationSec < 600 ? 48 : 96;
  return Math.min(byBudget, byProfile, budget.maxFrames);
}
This estimate doesn’t need to be perfectly consistent with the vendor’s bill, but it must be sufficient for admission, alerting, and cost attribution. The actual token usage should still be based on the usage returned by the vendor or the platform’s billing.
6. Caching: Cache Files and Sampling Results
Video caching should be at least three layers:
| Cache Layer | Content | Explanation |
|---|---|---|
| Raw file cache | Same video sha256 is not re-uploaded or processed | Avoids duplicate transfer and storage |
| Probe cache | Metadata like duration, fps, codec, streams | Avoids re-probing every time |
| Sampling cache | Frame sequence for the same video, profile, and resolution | Reuses already extracted frames |
The cache key should include the full dimensions:
video_sample:{video_sha256}:{sampling_profile}:{resolution}:{decoder_version}:{preprocess_version}Don’t just use video_id, because the same video might use different sampling strategies and resolutions for different tasks.
Quality Evaluation: The Video Pipeline Must Be Replayable, Not Just Look at the Final Answer
Video understanding evaluation should cover at least three types of tasks:
- Overall summarization: Does the model cover the main scenes, people, actions, and conclusions?
- Temporal localization: Can the model answer “when did a certain event happen”?
- Detail recognition: Can the model read on-screen text, tables, UI states, or small objects?
Each evaluation sample should save: the original video version, sampling profile, frame extraction manifest, model version, media resolution, prompt version, and human reference answer.
{
  "case_id": "video_eval_ui_bug_001",
  "video_sha256": "...",
  "task_type": "screen_recording_ocr",
  "expected_timestamps": [125.0, 138.5],
  "expected_observation": "User clicked save and a permission error prompt appeared",
  "sampling_profile": "screen_recording_ocr_v2",
  "media_resolution": "high"
}
If the model answers incorrectly, first determine: Was the key frame sampled? Was it sampled but the resolution was insufficient? Was the timestamp alignment incorrect? Or was it a model understanding failure? This is more effective than simply swapping the model.
Applicable Scenarios
This video input pipeline is suitable for the following scenarios:
- Customer service quality inspection, meeting recording summarization, classroom video Q&A
- Operational screen recording analysis, UI testing, Computer-use replay
- Security footage, accident videos, quality inspection video event localization
- Product videos, training videos, live stream clip content understanding
- Long video offline analysis and batch processing tasks
Scenarios where it’s not directly applicable include: strongly real-time video calls, medical imaging diagnosis, legal evidence original analysis, and industrial defect detection. These scenarios require stricter model evaluation, human review, and compliance pipelines.
Common Misconceptions
Misconception 1: More Frames Are Always Better
More frames mean higher cost and latency, but quality doesn’t necessarily improve linearly. For general summarization, a few representative frames might be sufficient; for event localization, the key is to capture the critical moment, not to cram in more frames evenly.
Misconception 2: Only Save the Extracted Images, Not the Timestamps
Without timestamps, a video degenerates into a collection of images. Model outputs cannot be traced back to the original video, and quality evaluation cannot determine if key events were captured.
Misconception 3: Use High Resolution for All Videos
High resolution is suitable for reading small text, UIs, tables, and details; for general action recognition and summarization, low/medium resolution is usually sufficient. The Gemini documentation also recommends using low or medium for general videos, and high resolution mainly for text-heavy or small detail scenarios.
Misconception 4: Treat Decoding Failures as Model Failures
Many video problems occur before the model: file corruption, frame read failures, abnormal timestamps in variable frame rate videos, missing audio tracks. Decoding and sampling steps must have independent error codes.
Misconception 5: Feed Long Videos Entirely into the Model at Once
Long videos are better suited for segmented processing: first split by chapter, scene, or time window, then perform local analysis, and finally aggregate. Cramming too many frames in at once is both expensive and difficult to interpret.
Go-Live Checklist
File Admission:
- Are file size, duration, resolution, frame rate, and MIME type restricted?
- Is there a distinction between inline, File API, Cloud Storage, and async tasks?
- Is the original file hash and source recorded?
- Are file states like “processing” or “failed” handled?
Decoding and Sampling:
- Is ffprobe or an equivalent tool used to record duration, fps, codec, and streams?
- Is there a unified sampling profile?
- Are frameIndex, timestamp, reason, and image hash saved?
- Is there support for skipping corrupted frames, recovery, or failure marking?
Budget and Cost:
- Are media tokens estimated based on sampled frame count and media resolution?
- Is the max frames limited by task type?
- Are actual usage, latency, and cost recorded?
- Is there support for adaptively reducing sampling density when over budget?
Quality and Replay:
- Is there a video golden sample set?
- Do the tasks cover summarization, event localization, and detail recognition?
- Can the same video, same sampling strategy, and same model version be replayed?
- Is there a distinction between sampling failure, decoding failure, and model understanding failure?
Conclusion
LLM video understanding is not as simple as passing an MP4 to the model. The real production problems are: which videos can enter, which frames to extract, along which timeline to align, how many media tokens to spend, how to replay after failure, and how to evaluate quality.
It is recommended that teams first break down the video input pipeline into five observable steps: File Admission → Decoding Probe → Frame Sampling → Timestamp Alignment → Budget Check. As long as these five steps are stable, whether you are connecting to Gemini, OpenAI’s image frame approach, a self-built vLLM multimodal model, or offline batch processing, you will have a clear cost boundary and a troubleshooting path.
References
- Google Gemini API, Video understanding: https://ai.google.dev/gemini-api/docs/video-understanding
- Google Gemini API, Media resolution: https://ai.google.dev/gemini-api/docs/media-resolution
- Google Cloud / Vertex AI, Video understanding: https://cloud.google.com/vertex-ai/generative-ai/docs/multimodal/video-understanding
- vLLM, Multimodal Inputs: https://docs.vllm.ai/en/latest/features/multimodal_inputs/
- FFmpeg Documentation: https://ffmpeg.org/ffmpeg.html
- OpenAI API, Images and vision: https://platform.openai.com/docs/guides/images-vision
- Generative Frame Sampler for Long Video Understanding: https://arxiv.org/abs/2503.09146